It's a Shimano Deore LX FC-M571 Octalink crankset with BB-ES 70 (118mm) bottom bracket. I really like the blue-gray colour of the whole crankset, but because it requires special tool to remove and install, I have to forget about it. In fact, the mere mention of octalink causes nausea and headache.
Anyway, I noticed that one of the middle ring tooth had chipped away (yes, broken). I wouldn't mind if it's from the big ring. So, I have to toss the whole set away, including the BB. Give me a shout if you need replacement for your set, I’d be happy to arrange for it with you.

Tools Required

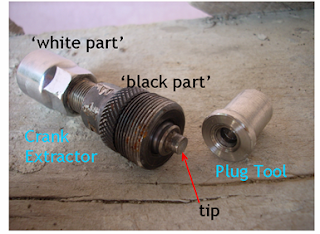
a. Special Plug Tool. No, it’s not Shimano’s TL-FC15. It’s Atuk’s – custom machined.
b. Crank Extractor (for square tapered BB). We’ll use the convention of ‘black part’ for the crank holder, and ‘white part’ for the tip pusher.Also, other main tools needed to get the job done – L to R: BB remover, wrench, 8mm Allen wrench.

Tools are set, now we’re ready to do the job.
The Job
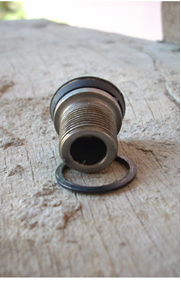
1. First, take out the crankarm fixing bolt, washer and cap by using the 8mm Allen wrench. Rotation: counter-clockwise.

Note that the fixing bolt is hollow.


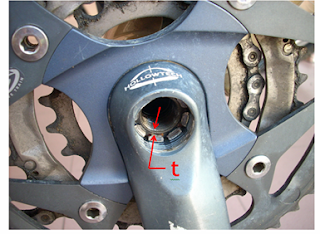
This is how the crankset looks like with the fixing bolt removed. Note the minimal space, ‘t’ on the BB spindle face for the flange of the Plug Tool to sit on.
This is why the normal crank extractor cannot be used by itself. It will be only pushing air in the hollow spindle.

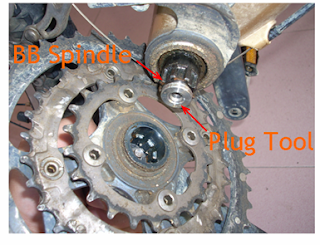
2. Insert the Special Plug Tool into the hollow bottom bracket spindle. The flange sits nicely onto the face of the BB spindle, and not touching the crankarm at all.

3. Insert and fasten the crank extractor tool (black part only) into the crankarm thread. Rotate clockwise, as in ‘righty-tighty, lefty-loosey’ – this rhyme also applicable for normal bolts and nuts threads.

4. Screw in the white part of the crank extractor clockwise by using a wrench of suitable size. This will slowly push the tip of the extractor onto the Plug Tool placed earlier.
As the crankarm is held on the extractor (black part), the pushing of the extractor tip will actually make the crankarm (together with the chainrings) ‘pulled’ outside away from the BB spindle.
This eventually will extract the crankset from the BB spindle (hence the name Crank Extractor).

5. Done! Well, half-done. Next is to extract the left crankarm. Repeat the same process as above, starting from the very beginning.
This is how it looks like when the crankset (right side) is taken apart – extracted - from the BB spindle. The BB spindle is 8-splined (8 = Octa. Hence the name Octalink). Yes, the dirt and gunk trapped in between are real.


Akmal,you have saved my sanity - unfortunately not one of my doors that got in the way of a vent of frustration! I didn't have a lathe in my house to make a plug so I searched for a hex head bolt that just fitted. Perfect! Cheers, Brendan.
ReplyDeleteBrendan,
ReplyDeleteYes, a friend of mine also mentioned about putting in a bolt through. Forgot to update it here.
Thanks to you for pointing it out.
Glad that you're still sane.
Enjoy your rides!
Updated!
ReplyDeleteSee here: http://akmalbikepark.blogspot.com/2009/06/octalink-crankset-removal-solution.html
thanks, this helped my octalink removal voes XD
ReplyDelete