akmal's bike park

akmal's bike park

Tuesday 30 September 2008

Selamat Hari Raya!

To fellow riders and readers:

Selamat Hari Raya Aidilfitri
mohon dimaafkan, kesalahan yang zahir dan yang tersembunyi.

Enjoy your holiday, and come back safely (and we'll go offroad again soon insyaAllah).


Monday 29 September 2008

hydration bag

Not to say that I'm not happy with my High Sierra 2L hydration bag.
I am, and in fact it has all the features I need for a decent bag.

This one caught my attention, though.
From Oakley's Mountain Bike range, Tool Pouch 2.0 is pretty neat.
It has that understated look.
Added with 100 oz (about 3L) Moflow bladder from Polarpak, it's in my wishlist.
Wonder where I can have a look (and feel, inspect, drool over) here in Malaysia.


Friday 26 September 2008

K2 Pro-Flex


I bought this bike (or remnants of it) from my younger brother Apis.
He bought it (long ago) from a friend.
After quite some time searching, i finally found the make and model of the bike.
I was browsing thru old MB Action magazines bought from Darren, and i saw it - K2 Pro-Flex bike.
Old school. And it's a K2, man! Cool, then.
I continued my search online, and it brought me to BikePedia.
Finally I got hold of the original specs - much of it is no longer on the bike. I narrowed down to three models similar to the one that is with me:
photos below taken from BikePedia

K2 ProFlex 1000


K2 ProFlex 2000


K2 ProFlex 3000

It's a 1998 model. Wow! From 10 years ago.
Well, I guess it's the 1000 model. The other two boast with Noleen Cross-Link forks (or are they Girvin?). I don't think the original owner would swap the Cross-Link fork with an 80mm Manitou Magnum. But then again, 1000 would have RS Indy fork.
Ahh... Never mind.

When I bought the carcass, I was thinking of only salvaging usable parts for building a hardtail. Well, I got a few:
  • Bontrager 50mm stem
  • Titec 25.4 riser handlebar
  • Titec 27.2 seatpost
  • V-brake bosses from Manitou Magnum fork
  • Shimano Deore XT hubs (for v-brakes)
  • Amoeba head-lock
  • Rims (later tossed away, changed to Mavic 719s)
It is interesting to note that the shifters were XTR. Anyway, they're in bad condition, only the barrel adjusters are usable. If you need them, leave your contact details.

I'm thinking of rebuilding the bike. Three major things with the frame:
  1. Swingarm bushing need to be changed - don't know where to get
  2. Rear coil shock - not in good condition - say, 6/10
  3. Rear v-brake boss bracket damaged
For #3: to resort to disc brake, I have to source for the adapter (as pictured below).
Anybody kind enough to help me with this?


A2Z rear disc brake adapter - photo taken from internet (sorry, didn't take note of the URL)

Another problem: I don't have the space for another bike. Duhh!!

Anyway, it'd be a heck of a project. Perhaps someday. Yeah, maybe someday.


Thursday 25 September 2008

Power and Cadence

(excerpt from The Elegant Solution - Toyota's Formula for Mastering Innovation, Matthew E. May)

Run The Numbers
: Lance Armstrong

Following his bout with testicular cancer, Lance Armstrong found that his physiology had changed. he was lighter, with a diminished musculature. The way his body most efficiently produced power had changed. He needed a new way to ride the bike in order to compete at the elite level.

He examined the power equation:
Power = Force x Velocity
where:
  • Force = the force applied to pedals
  • Velocity = leg speed, or pedal cadence
He did the math, looking at the variables.
If it takes 200 watts to move a bike at 20 mph, what were the possibilities? What were the differences of pedalling 70 rpm, versus 100 rpm?
Lower cadence requires higher force applied to each pedal stroke, which means more work for the leg muscles, and quicker fatigue.
Lower force to the pedals required higher cadence, which meant more work for his heart and aerobic system.

Given his stronger aerobic engine, he switched to spinning lower gears at a much higher cadence. It ran counter to widely accepted practice of driving big gears while seated. But it worked. No one could touch him in grueling mountain climbs of the Alps and Pyrenees.

Personal note:
Cadence was the the first thing I learnt about from a friend, Zaidi. He noticed I was using big rings while testing his hardtail (a very lightweight hardtail), and taught me about cadence and power.
It's with cadence that you could sustain long rides as with XC.

Well, I'm applying, and still learning.


Wednesday 24 September 2008

bike rack dilemma

20/9/08
on the way to pasir gudang kayuh malam 2 RV point, i was stopped by police at a road block - he saw my bike at the rear of wira sedan that i drove.

the officer asked me what i did wrong. i said i did not do anything wrong.
he gestured to my bike and mentioned that it was wrong to carry it that way.
he pointed out that my rear wheel was protruding more than the width of the car, and the rack elongated the car's overall length.
he asked whether i think it is stable or not having a bike on the carrier behind the car. i said i was pretty sure that the bike and the carrier are stable.
again, he stressed that it is wrong to do it and he went on further saying that it is okay if bikes are carried on the roof.
at that point, i just listened to his explanation and such, blah blah blah.
anyway, i listened intently with a stoned face, and head nodding all the way.
he agreed to let me go this one time, and not to do it again.
well, i put it all behind and headed to the RV point in Cahaya Masai.

22/9/08
i called jpj's number available on its site.
redirected to 4 officers, before ended up with a very long wait for an officer in technical department to answer my query.
went back to jpj's site and looked for any info.
got this:
http://portal.jpj.gov.my/v5/index.php/en/Technical/Vehicle-accessory-installation-application-guide.html
the form doesn't mention 'basikal'. anyway, it's a general form/letter for all sorts of stuff to be carried on the vehicle.

also:
http://portal.jpj.gov.my/v5/index.php/en/Technical/Guidelines-on-the-Modification-of-Private-Vehicles.html

searched some more,and i got this:
http://fakawitribe.com/tribaltalk/viewtopic.php?t=2310&highlight=

entry by keropok, May 2007:
Guys...i was the one who responded to BBS
This is my take on the issue which is freaking retarded and waste of time...
Got stop at east cost highway from Kuantan to KL last month. Got stop by JPJ and was ask form one of them for the so call approval letter from JPJ. I was kinda of confuse coz i tought that u dun need one. As i could not produce it..i got summon for it. Thank you JPJ for making me go all the way back to Thule Ikano and screw the wrong guys for nothing.....
The next day (as i was still on leave) went to JPJ in Putrajaya and inquire about this so call approval letter. Yet they made me wait for 1 hour just to get verification on the issue. I was pass from one counter to another like a football. Finely after 2 hours of footballing was able to meet up with the "pengarah" from Bhg Teknikal JPJ. Nice guy and was well inform on the procedure of how to get it approve. But when i ask him that Thule said it was ok to use it. His reply was
" Tidak mengikut specs kenderaan asal" he also mentioned that Thule came to see him and wanted to get approval to sell the racks. But JPJ said u can sell but we will not come out with a letter or statement saying It's JPJ approval. rear mount racks are a no go for hatch back cars..as it posses a danger if the car were to be ram from behind. If for sedan you will need to make sure that the number plate, brake lights and signal lights are visible from behind. So it's best to go wif the top mount.
So to make a long story short......Get the borang for RM2 at the counter on the 2nd floor....fill it up provide 3 pics from different agle (front, back and side) Make sure the pics are clear and no handphone pics.....Learn the hard way for it Go back to JPJ putrajaya same floor submit the borang and pics....and wait. if yr lucky the suffering of waiting will be about 1 hour...of not..like me half the day....Just to get a signature and JPJ chop......And yet still have to pay the farking summon.......jezzzzzzz....all this for just to hv fun with nature.....
=end of entry=

i'll settle with the issue for now - just stash my bike in the car.


fancy bike lights

while in Ramadhan the hot topic is night riding, here's a good accessory to bling-bling up your bike.
http://www.monkeylectric.com/m132s_gallery.htm

cool!


Tuesday 23 September 2008

hujung minggu yang sibuk

jumaat
hari jumaat lepas, ada aktiviti kayuh malam sekitar pasir gudang.
start 11 malam, pukul 2 pagi baru habis - habis makan roti bakar & minum teh tarik lepas kayuh.
maka sekitar 2.30 pagi baru aku sampai rumah.
5 pagi bangun sahur, pastu subuh, pastu sambung tido.

sabtu
sebab tak cukup tido, rasa pening-pening siket pagi tu.
rantai beskal SRAM PG-971 aku beli kat Fay melalui BBS dah sampai!
maka, lengkaplah drivetrain 'powered by SRAM' aku untuk T-Bolt. oops, tolak FD Shimano LX E-type tu je - tak boleh nak elak, SRAM tak ada komponen yang macam tu untuk digantikan. kalau idak, aku dah buru dah.
sebelum asar aku, Naza dan Marsya pegi ke perpustakaan kat bandar untuk pulangkan buku (aku sambung pinjam belum habis baca). lepas tu, pegi holiday plaza beli baju raya Marsya sebelum balik rumah.

esok harijadi Adam. aku dah niat nak belikan dia sebuah beskal. aku tak tau dia suka atau tidak. kalau aku bawak dia pegi Toys R' Us belikan dia jam Ben10 (sebut: "ben-ten"), aku pasti dia melonjak suka punya. tapi aku tak pandai nak beli hadiah plastik yang harga rm100 untuk budak umur 6 tahun. iye... harga mainan plastik tu rm100 bang...

petang tu aku sekeluarga pergi kedai beskal kat Masai.
kami angkut 2 buah beskal saiz budak, satu untuk Adam dan satu untuk Marsya.
harijadi Marsya awal bulan oktober. takpelah, sekurang-kurangnya Adam ada lah kawan untuk berkayuh sama-sama nanti.
lagipun, awal bulan okt tu aku pun tak pasti kalau $ masih ada lagi :)
melompat anak-anak aku bila akhirnya aku belikan sebuah beskal untuk seorang. suka rupanya diorang. Adam tak henti-henti cakap "Ayah, thanks for buying me the blue bicycle".
hehe...
aku rasa aku tau macamana perasaan diorang tu. aku pun penah rasa macam tu masa lepas tingkatan 3 dulu. tapi laen siket la, pasal aku pegi kedai singer kat simpang empat jalan kovil hilir/jalan sentul beli beskal 'racing' cap raleigh ngan abang aku je. ayah bagi duit soh beli sendiri.
hmmm... nanti lah, lain kali aku cerita siket-siket pasal cerita dulu-dulu.

petang tu balik rumah dah nak maghrib dah. tapi diorang sempat lagi cuba-cuba berkayuh seminit-dua.

malam tu lepas aku balik tarawih, Naza ajak pergi Seri Alam berkayuh sekeluarga.
hehe... macam best tu.
aku pun sumbat 4 bijik beskal kat dalam avanza. 2 mtb, 2 beskal budak - siap roda tepi tu...
cuaca baik, dan kawasan tu pun tak banyak kereta lalu, boleh kira jugak le. kadang-kadang aje ada motor lalu.
maka, pertama kali kami sekeluarga berkayuh sepanjang jalan kat seri alam tu. ada laa dalam 1 jam kot.
aku tak ambik kira sangat statistik malam tu. sebab aku rasa happy kot. gambar pun tak ambik.

langkah seterusnya: kena beli alatan keselamatan untuk Marsya & Adam. lampu belakang lip-lap, pembalik cahaya, topi keledar, sarung tangan...

ahad
pagi-pagi lepas subuh, aku mulakan kerja selenggara beskal-beskal aku.
mula-mula, pasang rantai SRAM tu dulu kat T-Bolt.
lepas tu, bersihkan rantai kat Schwinn & T-Bolt.

awal jugak budak-budak tu bangun pagi ni. lepas bersiap, terus diorang kayuh beskal pusing-pusing kawasan belakang rumah, sambil tengok-tengok aku kerjakan beskal.

aku ambik keputusan untuk alihkan Cateye Velo8 dari T-Bolt ke Schwinn. Setakat ni beskal tu yang lebih banyak bergerak (sampai T-Bolt tu dah bersawang dah).
Maka, kerja pemindahan pun dibuat. Tapi bila tengok balik, dah macam-macam benda alah aku letak kat Schwinn tu. Lampu la, lip-lap kat injap tiub tayar depan la, loceng la... uishh.. meriah semacam je... tu tak masuk dengan cermin pandang belakang yang aku cadang nak pasang jugak tu...
takpe lah, lantak le, beskal aku kan.
(pagi tadi - Selasa - aku pasang braket untuk kunci gelung beskal pulak kat batang tempat duduk Schwinn tu jugak... hahaha...)

dah abis tu, aku kerjakan T-Bolt pulak - pasang alat kawal jauh untuk 'motion control' sepit udang RS Revelation 409.
agak leceh jugak, pasal kena baca buku panduan dulu (sebelum tu kena cetak dulu). dan, tuas yang Angah bagi kat aku tu tak sama dengan apa yang tertera kat dalam panduan tu. makanya, aku pun agak-agak sendiri aje la.

selepas dah agak lama nak fahamkan panduan tu, baru la aku tau serba-serbi pasal sepit udang tu. hebat jugak fungsi-fungsi dia rupanya...
tau la aku siket-siket apa itu floodgate dan fungsinya (RVLATN 409 tu guna internal floodgate).
dan, siap ada allen key 2.5mm tersorok kat penutup rebound adjuster kat kaki kanan sepit udang tu rupanya.
tambah sayang aku kat T-Bolt tu. bila laa nak pegi offroad lagi ek?

dah tengahari baru laa abis aku buat kerja tu semua. penat jugak seyy... tapi puas.
hujung minggu yang memuaskan.


Friday 19 September 2008

Ramadhan Night Ride - around JB from Danga Bay


me, edy, aril


bapok, cai, me


bapok, dafi, isaac, me, nabiel

Event date: 12th September 2008 (Friday)
I got the news of the night ride from the chatbox in BBS a few days before the event.
And found Haji Amir's website, with info of the ride. They had similar ride the Friday before.

After iftar and maghrib I stuffed the bike and riding gears in the car.
Then after isya' and tarawih - 8 only :), i dashed towards Danga Bay.
Reached DB 9.30pm and seems that I'm the last to arrive. Others have arrived much earlier, including Isaac (my office mate) and Dafi.

I unpacked and got my bike ready straightaway. The first to greet me was Haji Amir himself, and then I saw familiar faces - including Wak from Pasir Gudang. Nabiel (got to know him from BBS) was also there, and of course, Aril.

By 10pm everyone was eager to start the ride, after the route briefing from Haji Amir. Ahh, but one rider was still on his way. So we waited and only at 10.30pm we started riding.

Route:
Danga Bay > Angsana > Bandar Baru Uda > TWP > Larkin > RTM > Johor Specialist Hospital > Jalan Abdul Samad > Ring Road > Jalan Yahya Awal > Post Office > Pan Pacific > Jalan Trus > Lido > Danga Bay

The ride claimed one casualty - a virgin rider, near TWP. Vomitted after a mild climb. I do hope that it won't deter his riding ambition.
The swooping downhill corners of Jalan Abdul Samad was really enjoyable. I don't have a meter equipped on my Schwinn, so I don't know what's the max speed.

It was quite enjoyable riding around town during night time. Just that there were still many vehicles around. I can't stand the smoke. Some of the guys went to Pan Pacific trying out riding down the stairs, while others waited for them beside the non-operational Waterfront City. I enjoyed the scenery - lights from Singapore just across the causeway.
Very soon after that we were back in DB.

More photos here.


Thursday 18 September 2008

Chain Tool / Multitool?


http://www.topeak.com/products/Tools/ChainBOT

Another item in my wishlist. Again, a beauty from Topeak.
Claimed at 148 grams, reported price is $42 in US.
The price is actually for the design - it won the prestigious design award by red dot.

But then again, Crank Brothers have these:

http://www.crankbrothers.com/multi17.php

Crank Brothers' Multi-17 tool.
Priced at $27, and weighs 168 grams (with all the other tools, mind you).
Hmm... this would well replace my dilapidated Tesco multi-tool - and I don't have to carry separate chain tool.

Problem is, Crank Bros listed only one dealer for Malaysia - and it's in Singapore!
Anybody kind enough to get me one?
Ehm... my birthday is in March (but you don't have to wait until then, really).


Wednesday 17 September 2008

Diamondback Apex SL


Diamondback Apex SL 15" Hardtail.

Finally it's completed on Sunday.
Got the Truvativ FiveD crankset with Shimano non-series square-tapered BB from a bike shop in Masai at a decent price.


Brakes: Tektro IO mechanical disc brakes with Tektro Sensir levers
Shifters: Shimano Deore 9 speed
Handlebar & Stem: GT
Crankset: Truvativ FiveD
Pedals: VP alloy
Wheelset: Rigida Taurus disc brake with Formula hubs and Cheng Shin tires (cheap only, meh...)


Rear Derailleur: Shimano Deore LX RD-M570 Cassette: Suntour 9 speed 11-32T


Front Derailleur: Shimano Deore LX


Fork: RST Omega Air 80mm


Seatpost: Titec
Saddle: WTB Rocket V with reflector

Again, thanks for these people who helped in a way or two:
  • Angah: for the frame and parts largely used for this project
  • Nabiel: for the cheap pedals


clean 'em up!


I bought these from ACE Hardware at Ikano Damansara.
  • Liquid Grease & Oil Remover from Selley's - for cleaning bike chain (use as the bath for chain cleaning tool)
  • Hand Cleaner from Abro - well, for cleaning my hands after maintenance/repair job.
I dilute the liquid degreaser to 1:2 ratio with water. Excellent job for the price.

The hand cleaner is citrus based with pumice powder for that scrubbing effect.
Not only it does the job well, my hand smells nice too.


Tuesday 16 September 2008

Monday 8 September 2008

Naza's Diamondback Apex SL


If you're observant enough, you'd noticed that the bike is not complete.
Well, everything's there except the crankset and BB.
Soon, very soon, insyaAllah.


Thursday 4 September 2008

rear view mirror


http://www.topeak.com/products/Xtras/Bar_n_Mirror


this is nice...

i need this for cycling to work, especially when going along the highway.
cars and motorbikes going vroom vroom, at high speed (from the bike saddle, they are ultra fast).
i don't need the bar end, though.
and it is expensive - RM100+.

think i'll settle for a cheapo mirror from the bike shop in Masai then.


Wednesday 3 September 2008

riding paraphernalia

This is a list of things that I always bring with me (or wear) for any ride - road or offroad.
  • Bicycle
  • Handphone
  • Helmet
  • Gloves
  • Shoes - for now: a pair of futsal shoes
  • Spare inner tube
  • Pump
  • Multi-tool - a cheap one from Tesco
  • Tire levers
  • Tube patches and glue - also from Tesco
  • Long nose pliers
  • Chain tool - yet to have spare links to complete
  • Water - at least a bottle (750ml) for short trips i.e. to work. For offroad: 100 Plus - 1.5 to 2 liters
  • Identity Card
  • Cash - without coins
  • Headlight & Taillight - for road and night rides
  • Reflectors (on jersey)
  • Wet lube
  • Cable ties (assorted sizes)
  • Plastic bag
The list above is based on the one found in KLMBH site - a must for every rider participating in any Bash.
I added some more, after extensive reading from few other sites. Also, from personal riding experience and tips from other riders.
There are also some items left out - perhaps not needed, and there are tools that I just don't have any idea how to use.

Safety First. Helmet, reflectors and lights are the important ones. Other than that, the items stuffed inside my bladder bag are needed during emergency situation. There's no need to carry extra weight.

Some riders may prefer to stay lean, thus they carry very minimal emergency/spare items. Fine, if nothing happens. If something does happen (and according to Murphy's Law, it will), they'll turn into bloodsuckers, although they are actually very nice people. I've been to offroad rides where a guy didn't even bring his own water, but he put his supply in another rider's bag. It's plain evil, no excuse for that.

I bring with me my IC for safety purpose. Once we rode up into 'Bukit Radar' in Plentong. It is a Malaysian Air Force base. While going uphill, there were army men going up and down too. I thought their perplexed faces were because looking at us crazy people cycling up the hill a la Le Tour de Langkawi. It turned out that they were actually alarmed because civilians are not allowed to go up there. While taking a breather when we got up at a point (beyond which, is restricted area), 2 army personnel came down to us and began questioning. To confirm that we are Malaysians (and not spies from foreign countries), we were asked for our ICs. Gladly we showed ours, and soon we went down off from the restricted area.

So, bring the essentials for safety and emergency. Pack light if you can, but never to leave anything important behind. You might regret not bringing along a tool just to save 200 grams. Heck, I know a guy who brings with him all sorts of spares, he's like a bikeshop in the trail. Actually, I do feel safe when he's around. Me, a bloodsucker, maybe?


Monday 1 September 2008

octalink crankset removal

Finally I managed to find the time to remove the LX crankset from T-Bolt.
It's a Shimano Deore LX FC-M571 Octalink crankset with BB-ES 70 (118mm) bottom bracket. I really like the blue-gray colour of the whole crankset, but because it requires special tool to remove and install, I have to forget about it. In fact, the mere mention of octalink causes nausea and headache.
Anyway, I noticed that one of the middle ring tooth had chipped away (yes, broken). I wouldn't mind if it's from the big ring. So, I have to toss the whole set away, including the BB. Give me a shout if you need replacement for your set, I’d be happy to arrange for it with you.

Shimano Deore LX FC-M571 Octalink crankset (with broken tooth)

Tools Required

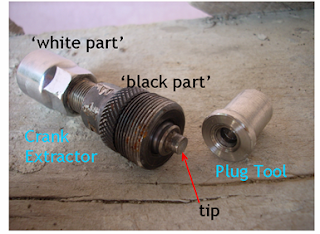
Crank Extractor and Special Plug Tool


a. Special Plug Tool. No, it’s not Shimano’s TL-FC15. It’s Atuk’s – custom machined.
b. Crank Extractor (for square tapered BB). We’ll use the convention of ‘black part’ for the crank holder, and ‘white part’ for the tip pusher.Also, other main tools needed to get the job done – L to R: BB remover, wrench, 8mm Allen wrench.


L to R: BB remover, wrench, 8mm Allen wrench

Tools are set, now we’re ready to do the job.


The Job

1. First, take out the crankarm fixing bolt, washer and cap by using the 8mm Allen wrench. Rotation: counter-clockwise.

take out the fixing bolt

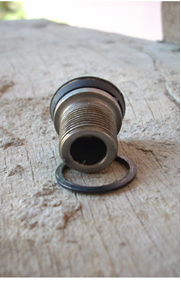
Note that the fixing bolt is hollow.

fixing boltfixing bolt - showing hollow

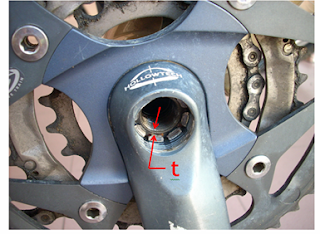
This is how the crankset looks like with the fixing bolt removed. Note the minimal space, ‘t’ on the BB spindle face for the flange of the Plug Tool to sit on.
This is why the normal crank extractor cannot be used by itself. It will be only pushing air in the hollow spindle.
small space on BB spindle face

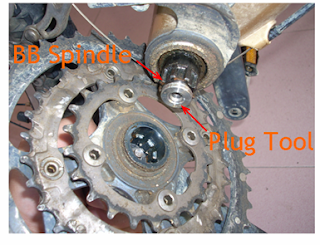
2. Insert the Special Plug Tool into the hollow bottom bracket spindle. The flange sits nicely onto the face of the BB spindle, and not touching the crankarm at all.

Plug Tool in place

3. Insert and fasten the crank extractor tool (black part only) into the crankarm thread. Rotate clockwise, as in ‘righty-tighty, lefty-loosey’ – this rhyme also applicable for normal bolts and nuts threads.

tighten crank extractor to crankarm

4. Screw in the white part of the crank extractor clockwise by using a wrench of suitable size. This will slowly push the tip of the extractor onto the Plug Tool placed earlier.
As the crankarm is held on the extractor (black part), the pushing of the extractor tip will actually make the crankarm (together with the chainrings) ‘pulled’ outside away from the BB spindle.
This eventually will extract the crankset from the BB spindle (hence the name Crank Extractor).


extract!

5. Done! Well, half-done. Next is to extract the left crankarm. Repeat the same process as above, starting from the very beginning.

This is how it looks like when the crankset (right side) is taken apart – extracted - from the BB spindle. The BB spindle is 8-splined (8 = Octa. Hence the name Octalink). Yes, the dirt and gunk trapped in between are real.

crankarm extracted

Octalink BB spindle - with dirt