akmal's bike park

akmal's bike park
Showing posts with label accessories. Show all posts

Sunday, 22 May 2011

Review: Ibera beam rack with bag


Ibera Pakrak beam rak with bag
I heard about them only when I bought the rack and bag at Senawang. Perhaps you won't find these orange/black items quite easily in bike shops in Malaysia, compared to the more established yellow/black ones. Anyway, this review is to highlight the hits and misses, based on my usage. More importantly, is to assist those who are wondering if these are as good, for there are not many reviews around the internet.

item
Ibera RA-1 beam rack and Ibera BA-1 commuter bag.
It's a system of a beam rack and commuter bag, with push-lock and secure tab on the bag to fit on the beam rack.
The beam rack is secured to the bike's seatpost by means of tightening an allen bolt.

price
I paid RM228 (RM69 beam rack, RM159 bag) for the system. This system is priced quite competitively - I saved a bit more than RM100 for a comparable yellow/black one.
:)

material
Bag is non-waterproof, but water-resistant, perhaps due to the zippers.
Nylon material is with waterproof layer backing.
ABS base for sturdiness. I like this part, but worried that it would crack some day. So far, it's still good except for scratches at the edges.

stainless steel allen bolt
ALLEN BOLT
This is the most important bit, so read carefully.

It is not a simple means of securing the beam rack to the seatpost, in comparison to a quick release system. You would need a 5mm allen key to tighten the bolt.

I have to mention that the one that comes with the rack is best kept in your spares case. The allen key slot on the head would give way and get rounded by the torque applied in tightening up the rack to the post. In my case, the rack is an on and off affair - I have to tighten and loosen up the bolt many, many times due to that. And the bolt did become a bit rounded.

Do get a stainless steel one for a replacement, even if yours is new. Ask for an M8x30 allen bolt (button head) at a hardware store, or bring along the one supplied with the rack to get the identical item. I paid RM1.80 for the bolt, complete with nut and washer. It's the least I could do rather than modifying it to a quick release (anyone have a tutorial DIY for this?).
 
seatpost size
I'm not sure what's the range of seatpost diameter for the beam rack. I've been using it on three common sizes over the course of 14 months. 2 rubber strips, thick and thin are supplied with the rack, for shimming. Check with your seatpost manual if it could take the load. I surely wouldn't ruin a carbon seatpost with the beam rack clamp.
  • 31.6mm seatpost is ideal. Reduced swaying, as it is secured quite tight due to the big diameter.
  • 27.2mm is okay, but would sway and wobble up and down a little (just a wee bit), due to the thick rubber strip.
  • 30.9mm gives the worst sway of all three. Perhaps because the rubber strip provided are either too thin (this one is used) or too thick (can't be used) for 30.9mm seatpost. That being said, it is not that much, as long as the allen bolt is secured very, VERY tight. That's why you have to get yourself the stainless steel bolt.
Extra: carry in the bag's pocket a 5mm allen key, just in case if it does need re-tightening (that's just me, being extra prepared).

max load 10 kg
weight and load
The 700 g beam rack is rated for carrying 10 kg load. Including the bag, of course. The bag itself is about 1 kg. So you have about 9 kg load that you can stuff in the bag.

I don't know how much weight I loaded into the bag, but I make sure that it is not too heavy so that the beam wouldn't sway as I ride the bike off-saddle. I don't want to carry a heavy bag when off the bike, either.
 
Carrying is by a grip handle on the rear pocket, or a padded sling provided with the bag. The bag itself is a bit heavy, so I seldom use the bag by itself to go to the office.
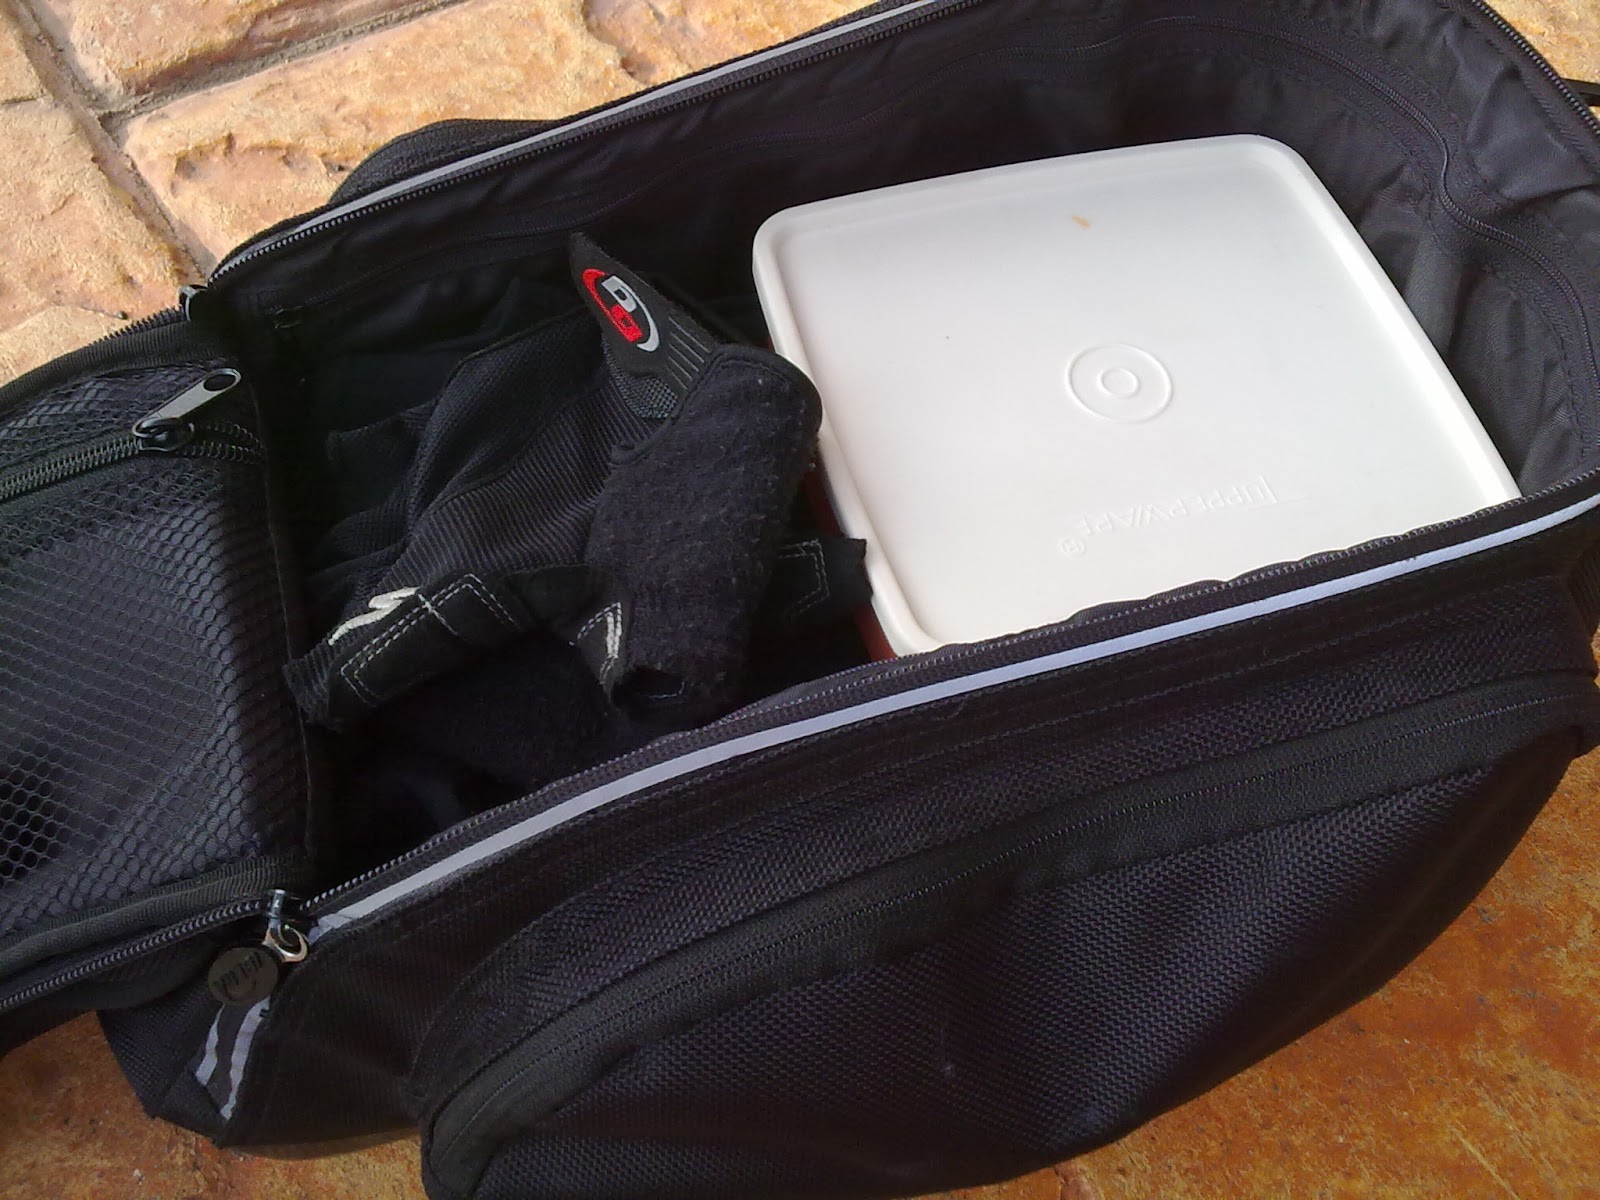
main compartment -
ample space for my daily essentials
bag space
The bag has a main compartment, 2 side pockets, a bungee cord on top of the main compartment lid and a zippered mesh underneath it, and a small rear pocket. There's also a zippered compartment on the lid top.

The maximum I carry at a time in the main compartment: a square Tupperware of breakfast, 750ml water bottle (occasionally), one khaki pants, one Endura rainjacket (quite thick when folded), one collared t-shirt and an underwear.

Side pockets are for storing tools and spares in one, and personal items in another. Rear pocket for small change and wallet. Zippered mesh is storing a handpump and spare tube. There's still unused compartment on the lid top. I spare that for extra breakfast (nasi lemak, or kuih for instance) or a face towel.
 
There you go, enough for everything, except a pair of shoes and toiletries. Well, I have those at the office.

lock-on mechanism on the rear
lock-on mechanism
The mechanism on the back of the bag provides a means for easy on and off of the compatible rack. However, the pushlock on the bag is not quite smooth, sometimes needing some fiddling due to some dirt lodged inside it. Once the tab on the front and the back (on the lock mechanism) are in place on the rack, there's minimal movement. It feels sturdy and solidly locked in place.

main compartment zipper
lined with reflector strip
safety
Safety aspect is taken care of. The main compartment zip is lined with reflective strips, so do the grip handle. There's also a loop for attaching a rear LED blinker. The beam rack has a bracket to mount a reflector (not provided).

overall
The bag and beam rack system is neat. It says "I'm a commuter" to whomever gazing at it. I like the shape of the bag. The shape is held so by the ABS base and the foam pad lining up the main compartment. The only thing that gave way is the bungee cord. The rubber cord is now expanded and not as elastic as new. I really recommend that the allen bolt to be replaced with a stainless steel one, if you're getting this system.

Is it worth the money spent? Yes.
Is it up for the job? Yes.
What can be improved? The weight of the bag, and perhaps to make it waterproof or at least a decent raincover.
Would I recommend it to you? Definitely.

more photos in here.


Tuesday, 22 March 2011

Review: NiteIze Marker Band

For my RTW, especially when riding wearing using long pants, the Marker Band is an indispensable item. It does a double job, safety wise: keeping the hem of the pants away from being stuck onto the chain/chainring whilst making me visible from rear.

NiteIze Marker Band on my right ankle
It's intended use is on the bicep; however, I use it on my right ankle while cycling.

It has a few options as a visibility marker:
Passive - reflective yellow band
Active - continuous red LED light
Active - blinking red LED light

The LED unit is the same as on the Sport Vest albeit shorter clear wand, with the same high quality for the make and material and with the same lighting modes - continuous, blinking and off. Battery is provided and I used the item straight away after taking it off from the packaging board.

NiteIze Marker Band

The unit is lighted by a small LED, and a clear wand is attached to it to disperse the light so that we get a long, lighted strip. Everything is encased in a reflective sleeve which is also fitted with loops to slip the elastic band in. The make is of high quality and feels durable too.

Visibility is good, and LED is bright eventhough it is encased in the reflective sleeve. The switch position is marked (printed) so that you won't have to wonder where it is. When using half finger gloves, I can feel the slight bump on the end of the LED unit - that's the switch. With full finger gloves, I have to look at the unit to turn on (or blink, or off) the LED.

Sporting an adjustable buckle on an elastic band, it is easy to strap on and to take off - the feature that I like most. As the strap is elastic, adjusting the buckle is easy - just fasten the buckle together, and pull the strap to your desired tightness. However, I'm afraid that over time it will give way. We'll have to see about that.

tuck the loose end in
Another thing to be careful with is that the elastic strap would have a long loose end dangling. I have about 3.5" loose end. This is foreseeable as the unit is intended to be used on the bicep. My biceps aren't big, either, and more so my ankle. I make sure that it won't get caught on the chainring by either tucking it under the marker, or just simply flip the buckle the other way around so that it would be on the outer side of the ankle. Having a proper way to secure the loose end (velcro, or provide a loop like a belt) would make it nicer.

At RM60 a piece, it is not cheap. But, you get what you pay for - high quality safety product. Other than the dangling elastic strap which is only a minor to me, there's practically no other negative side of the Marker Band that I've encountered so far. I'm quite happy with it.

Further reference:
NiteIze page on Marker Band

Marker Band is available locally through Gear 'n' Gadget.


Sunday, 20 March 2011

Seatpost: Giant vs Thomson

This is my report on my search for suitable (and as always, cheap) seatpost for my Trance. If you're not interested in finding a comparatively similar 30.9mm diameter seatpost to Thomson Elite, you may skip this.
:)

Giant Connect SL 30.9 seatpost
Giant frames that I have in my stable, Trance and Yukon Disc, are both requiring 30.9mm seatpost. That's the main important criteria of the search. Alongside, weight is also considered. Of course, the equally important factor, price tags are looked at. So that's two of Keith Bontrager's famous quote.

I have been wanting to own a Thomson Elite, much because they are light, beautiful, strong (although there's no empirical data on this); and the snob rights. "Thomson make parts for Boeing and Ford, too, you know..." would definitely gain envious smirks. Oh, I'd get a sticker and nice seatpost bag too.

Except for one thing: the price. Thomson Elites are generally in the RM300 range (USD99.95). You could find slightly less than RM200, but used item. From BBS, of course.

Anyway, from Thomson's wide range of offerings for their Elite type, the one suitable for my frames is SP-E128. Weighing at 243g for Ø30.9 x 367mm. So, that's the one to be compared with.

Not much are being offered by other third party manufacturers, and the one that is relatively easier for met to get is Giant's seatpost now that Jason's shop is stocking on Giant. I asked him for the price, and he told me that it would be less than RM100 for the aluminium ones.

I checked with Jason two days ago, the price for carbon Contact SLR is around RM200. Well, it's obvious that Contact SLR is out of the question for me. One, the price. Two, I'm not fond of carbon parts. Three, it's not aluminium - then it would not be a fair comparison to Thomson's (okay, there are actually only two reasons).

From Giant's 2011 catalog, there are 3 aluminium seatposts in their range, for mtb:
1. Contact
2. Connect SL alloy mtb
3. Connect
Details are as in the comparison table below:
  
The closest to Thomson's SP-E128 is the Contact seatpost. It weighs 243 grams, straight or setback. Contact is only 7 grams heavier. I'm not sure if it would be the same as Thomson's if the extra 7mm length is shaved off. Strength wise (being the other factor in KB's quote) I'm not sure with, as there are no data to support. However, looking at the material, perhaps it is safe to say that they are more or less the same. Thomson states that the material is of 7000 series al, while Giant's is of 7050 al forged single piece shaft.

So, my choice is clear then. Contact it is.

One problem, though. Jason didn't have it last 2 weeks. And none of the bikes on display in his shop has it. I didn't want to wait. That would be another 2 weeks, while I've waited 3 weeks already. So I went with the next best - Connect SL Alloy MTB. RM90. A third of Elite's price. Not too bad, I'd say. At only 35 grams heavier. Sheeshh...

the blue anodized rail clamp,
with side single bolt adjusment
The comparison cannot be made apple-to-apple, entirely. Giant's are without straight ones, but only a slight setback. Thomsons are either straight or setback. Saddle adjustment on Thomson's is via 2 bolts, while only 1 for Giant's at the side which is pretty convenient. Thomsons are either silver or black (read: boring), while Giant's has anodised blue bit up on the rail clamp (not that it is very visible). And I can't say to people that Giant makes parts for Toyota or Airbus too (good, I won't be a snob then).

Oh, I don't get a nice seatpost bag, or sticker when I bought the Connect SL seatpost. Never mind, for half of the parts on the Trance frame has 'GIANT' printed all over already.
Including my new seatpost.
:P

Cheap? Yes.
Strong? Hope so.
Light? Yes.
I'm a happy rider.

Have a nice day.
Thanks for reading my report.

Besides Giant, Specialized also use 30.9mm seatposts.
Weird people.


Saturday, 19 March 2011

Hydrapak Bladder Warranty Claim

I noticed that my Hydrapak 3L bladder leaking at the bottom outlet. Not the bottom valve, but at the joining of the bladder's outlet. This was after the GA MTB Ride. I'm not sure what causes it, and I don't bother about it anyway. What I know is that I've been using it for a good part of a year, so it is still under manufacturer's warranty.
 
In Malaysia, a 'warranty claim' has a remote possibility for it to be entertained. Well, I might as well spend RM5.70 for the poslaju and make a few calls, then see what happens. Worst scenario is that I would lose the bladder (can't be used anymore, anyway), and get a new one. That would open up an avenue to try out other brands and systems (Source by Deuter, Antidote by Camelbak, etc.).
:)
 
It has been a few offroad outings I'm without a water bladder. I'm pretty much dependent on water bottles now, putting one on the bike frame and one in the backpack. It's not that I'm ditching water bladder altogether, no. What I'm saying is that currently I can do without it, but perhaps only for my normal offroad outings which is circa 3-4 hours. I've been using water bladder for the conveniences that it bring, in direct comparison to water bottles. Simple as that.
 
So, I called Leong of KHS TTDI and queried about the matter. Without hesitation and without further questions asked, he told me to send over the defective item and he'll despatch it to the agent for a possible replacement.
 
Here's the timeline: 
2nd March 2011: sent out via Poslaju to KHS
3rd March 2011: received by KHS
7th March 2011: called to confirm the item's status. KHS already sent to agent for warranty claim
17th March 2011: KHS called, informing that replacement item sent to me via courier - ETA 18th March 2011
18th March 2011: new bladder received in good condition. Me a happy customer.
soon: back with riding with water bladder in my backpack
 
So there you go. All I had to do was ask. My old and stained water bladder is now replaced with a new and clean unit. And I encourage y'all to do the same as well, if you have such case; not limited to bladders only though. Let's practice our consumer rights. Of course I have to thank KHS too, for their good service rendered.
 
Thanks for coming over.
Have a good weekend.


Wednesday, 16 February 2011

Review: NiteIze SpokeLit

This item is neat and simple. Lightweight, too, and ready to be used right after you install it - battery is included. Plus, no tools required to install it onto your wheelset.
 
SpokeLit - shoved between my wheel spokes
Installation is a bit challenging although no tools required, and it is only suitable to 3-cross spoke wheels with normal spokes (14/15 gauge). It's a bit hard to get the spoke snugged into the groove on the SpokeLit. That being said, it is equally hard for the unit to come out from the wheel once set and slid further out from the hub towards the rim for increased holding. Definitely not for wheels with blade spokes, or the likes of Xero Element wheelsets. Make sure you have the right kind of wheelset (and spokes) in order to use this. Recommended for 32- or 36-spokes wheels.

lighted - static 
The lighting mode is continuous (press once), blinking (press twice) and off (third pressing). There's no special button on the body, just press on the middle of the unit's battery cover and it will lit. The body is translucent plastic, so the light coming out from the tiny LED is spread to the whole unit, effectively making it lit up; visible from either sides of the wheel.

 My unit is with red LED, suitable for use on the road in lieu of passive wheelset reflectors. When the wheel is spinning, you'll get a nice ring-of-light effect. Not highly visible from the rear or front of the bicycle, though, but definitely eye catching from the sides of the bike. I get 'whoa!'s from children on the roadside whenever I pass them by especially during night commute (adults would admire, too, but I know they'd suppress their awe).
:)

spinnin' around
Put it on your front wheel, and I would dare say that you'd also be glimpsing at your front wheel every 5 seconds to enjoy the glow.

I haven't tested it for waterproofness, i.e. direct spray, but after a few rides in the rain (and mud splats), the unit is still working. Thus, no worries in that department. The battery/LED/PCB dome cover which doubles up as the unit's on/blink/off switch looks the part in ensuring protection against water ingress.

It has high quality finish, and feel. Usage is perfect for night and dawn rides. My only gripe is on the installation bit. However, that also ensures that the unit won't fall of the wheel and lost along the roads. For that, I can still accept as it's a given.

Further reference:
NiteIze page on SpokeLit

SpokeLit is available locally through Gear 'n' Gadget.


Monday, 31 May 2010

Bicycle Times - Your Everyday Cycling Adventure

My Touch N' Go card was left with only RM19.70 credit. Somehow I bravely went and tapped through the toll booth at Simpang Renggam, destination Senawang. I didn't know what the exact toll fare would be, and in my head I calculated roughly. Conclusion: not enough, and I was being stupid not taking the toll ticket instead.

My mind was racing with possible solutions, and came out with 2; one is to go to R&R and top up via ATM kiosk, and the other one is to top up via ATM kiosk also but at the fuel station. I swerved into Machap R&R, and went up to the ATM machine. Dang, there's only CIMB ATM, no Maybank. Albeit, I went downstairs and went to a small shop which sells magazines among other things (tidbits, et. al.). I was looking for cheap bicycle magazines (past issues, 2nd hand if any), and I found Bicycle Times.

I flipped through, and I kinda liked it. It's different. Of course, because it is not the usual MTB or Road mag. It is more on bike commuting, touring, true cycling lifestyle. That sort of thing.The tagline itself makes me think - 'Your Everyday Cycling Adventure'. Everyday! At this point it makes me envious of regular commuters. Makes me realise also nonetheless that my RTWs are always an adventure. Just that I'm not able to do it everyday. And of course, it's saying that my mountain biking is just a weekend-only thing. Ha!

For RM17.50 that I paid, it's not thick, with not too much ads, too. The paper quality is also different. I suspect that it's printed on recycled paper. However, I don't find any info about that in the mag.

What made me buy the mag is that the issue is current. I mean, it's issue number 5, to be displayed until 7th June 2010. Well, okay, it's nearly at the end of it's shelf life. The reason being, the mag is published quarterly. Great, then. I don't have to fork out nearly RM20 each month. The only regret is that I forgot to ask for the receipt, for tax reduction purposes. Sheeshhh... Well, it shows that I was elated with my purchase, I guess.

The next morning, I managed to skim through the articles, letters and advertisements. They're just great. I had my doses of bike commuting reading from Xtracycle and Cyclescheme, and this one adds to it. Xtracycle sells their bikes, and Cyclescheme for reasons unknown to me, stopped at issue 3. Perhaps, this mag seems to replace those, in my book.

I learnt a few things, in the thin mag.
1. There was this cool Tweed Run in England on April 2010, and folks in the US ran it too. No, it's not a running event. Check out the cool period video.
2. Panaracer belongs to Panasonic family. Yes, the Audio Visual company. Well, Nick Yap of the Cycling Today bike shop in JB was right, after all...
3. Brooks got leather bike bags too. And their saddles are found on many of the bikes in the mag.
4. Cardiff is another company which offers leather saddles.
5. You have to check out the Kona Ute. Classy.
6. Cycling lifestyle is timeless. Enough said.
Oh, and BT by the way is a sister mag of Dirt Rag magazine, a mag for mountain bike.

Anyway, I noticed that while reading it, a little voice in me kept whispering subtly "you've got to get that Brooks saddles...".

Err... dear kind readers and blog followers, my birthday is just around the corner, in March.

I think I found my passion in cycling. No, not touring (yet... although that might materialise some day). I'm somehow motivated to do my RTW. Well, perhaps it'll be much more with a Brooks B-17 on me bum...

*********
Just in case if you're wondering, the toll fare from Simpang Renggam to Senawang would be:
Normal Rates RM 27.30, Off Peak Rates RM 24.60, Off Peak Festive Rates RM 22.20.
Total Distance 200.5 km.
I exited the Pagoh toll booth and tapped my TnG card to deduct RM11.60 (phew...). Made a U-turn just after the booth, and took a ticket. Continued the journey to Senawang straightaway after that.
Oh, and I topped up the card at a fuel station over the counter in Serdang. Now why I didn't think of that while in Pagoh.

Anyway, I'm glad I was being stupid while in Simpang Renggam, for the mag.


Tuesday, 23 February 2010

Cateye Mity 8

I lost my trusty meter during last Sunday's offroad outing in Seri Alam.
How's that for a nice excuse to get myself a new one. Yay!
Thinking that it would serve a few purpose, so I went ahead with it. To be honest, it was not really with much thinking, actually.
Anyway, it means:
1. A newer design than my Velo 8.
2. Hopefully better features.
3. A spare magnet for my RTW wheelset with slicks.
It was purely by chance that I ended up with Cateye Mity 8 (CC-MT400). Well, it's no accident that it's a Cateye, since I wanted it to be compatible with Velo 8's bracket and sensor. I've more or less narrowed down my choice to either Enduro 8 or Mity 8. I made a few calls that Sunday afternoon, and most shops are selling at about RM85. Surprisingly, Velo 8 is priced at RM80.

I went to the bike shop in Masai to send Marsya's front wheelset for repair. They have a Mity 8 (the only Cateye meter in the shop), and after haggling with the owner, I managed to get it for RM80. Not too bad. No need to burn fuel to Skudai or Tampoi. No need to wait for a few days if through BBS. And best of all, it's priced the same as Velo 8 - although I would be happier if it's not more than RM70.
Spent an hour to understand the functions of Mity 8 through the included manual. The difference with Velo 8 is that this one does away with the calorimeter (not of much use to me, by the way). Other new functions are dual trip distance and dual tire setting. Both are perfect for my RTW/offroad rides.
With dual distance, I could set the distance for my RTW to and from the office. With dual tire setting, I could set it for the two wheelsets I'm using - one for slicks (26/1.6") and another for knobbies (26/2.1").
Another plus: I could set the odometer manually. Currently continuing at 3500 km mark (my rough estimate of my dear 'ol Velo 8's reading).
I have to note here also that Cateye has improved the meter bracket for handlebar (no more using cable ties) and the sensor bracket for fork leg mounting. Much better than the Velo 8's.
Well, it proved to be a good buy in many aspects. Just that this morning I went out RTW without installing the new extra magnet on my slicks wheelset. Duhh!


Wednesday, 3 February 2010

Ibera PakRak, Senawang Bicycle Station

I went back to Senawang for Ayah's birthday, and my cousin's son Suhaimi's wedding ceremony last weekend.

There's a nice bike shop in Senawang, which I have been wanting to pay a visit. Senawang Bicycle Station is closed on Sundays (ride day), so I made it a point to go there on Saturday morning. I went out at 10.30 am after breakfast to the bike shop (an excuse to Ayah when he asked me where I'm going to). Before the bike shop, I went to Dataran Senawang to get Ayah's surprise birthday cake (an excuse to the others).
The mission of the visit: One is to check out the shop itself, and the other one is to get myself a Topeak MTX BeamRack, and discuss with Jeffree on which one should I get for the bike - Type A, E or V. At the same time, I'm getting the system bag MTX TrunkBag DX to complement it. Damage to the wallet expected to be in the range of RM350, following discussion with BC Kelolo. All for the joy of back-free RTW journey.
The bike shop is nicely stocked with bikes, parts, and good service. I was attended by Jeffree, all the while. And he remembers my name. From what I heard, he was Negeri Sembilan's cyclist in his heyday. If that's so, he should be good with bikes. Well, I would say that he is.
I told him what I was looking for, and he replied that he's just out of stock with the beam rack. For the bag, he's got only the EX, which is not what I'm after. However, he gave me an alternative - something I have never seen or heard before, goes by the name Ibera.
Huh?
Time for internet research, then. Well, at least they have a website that I could refer to. That evening, I went to my elder brother Amri's house nearby the shop (how nice...), and began my short research. Short, because I was short of time, and there's not much reference in terms of product review for Ibera's RA1 Carrier nor their BA1 bag. I guess I'll be the first to give a review in mtbr. At the time of writing, there's none.
Things that made me buy the items:
(+) The products are of high quality (well, I would say that it fared well compared to Topeak's EX), although both lacks the waterproofness. However, Ibera's have ABS carbon-look plastic base.
(+) It is a system - in this case, PakRak - looks neat and tidy. The carrier is rated at 10 kg, compared to Topeak's 9 kg. However, Topeak's MTX BeamRack is using QR clamp while Ibera is using allen bolt. Well, I could live with that.
(+) Price for both Ibera bag and carrier is RM228 (RM69 carrier, RM159 bag) - saves me $ by a bit more than RM100, although I have to pay RM10 for a year of BS membership in order to enjoy the discounts.
(-) I have to note here that as a system, Topeak's weigh in at 1.7kg while Ibera is 1.9kg.
Next, will be my review in this blog, and perhaps some time later, my mtbr review. I planned to have my first ride with it for RTW on Tuesday. Good things can't wait, I had it on Monday instead. Still to early to give my views, though. I got to tell y'all this: it's great to feel the wind on my back.
Now toying with the idea of a short road tour... hmm...


Saturday, 13 June 2009

classic bike bell

I was browsing the net with my daughter Marsya to help her with his school work. The subject is 'springs'.

So we googled for images of ehm ehm, full suspension bikes and also a bike bell (among other everyday things with springs of course).

This one from Zakkaliciousness' flickr caught my attention. Rustic bike bell. A visit to Søren Sögreni's website, and suddenly I was like transported to 50 years ago.

The price? 199dkk. That's about RM140. Pheww...

Anyway, a website with prices displayed is very nice website. I have always liked them.

Also from the flickr pages, I came to know that in Denmark bike bells are mandatory.

By the way, I still can't figure it out how to ring the Sogreni's bell.

Image by Zakkaliciousness


Monday, 30 March 2009

clipless

Yesterday's ride was a 2-in-1 event for me:
  • Brothers and sisters from MR MoBiC came riding with us (along with local riders from around JB - lost count how many of us actually went in).
  • I pedaled clipless offroad

Well, not all the way, and not all the time. Still in the learning stage. Most of the time I couldn't attach the cleat on my right foot. Only the left foot was attached to the pedal, and that was after struggling a bit to get it right. I need to adjust the setting of cleats on my shoes, especially for the right one, to get it right. Right? Right on...

Errr.. shoes? Yup! Finally got hold of 'em shoes. A pair of SH-MT41G. Thanks to advices from Dino, BC Kelolo, and Panjang, I got a good pair of shoes to begin with. I'm happy with the purchase, and even more happy to experience the clipless riding.

What awed me was the really light feeling when climbing up. Bukit Panjang felt a short distance uphill, and my bike felt a bit lighter. That was with only my left leg 'clipped' onto the pedal. I wonder what it'd feel if both are secured to pedals. Looking forward to that.

And perhaps also I should get a pair of clipless pedals to replace the pair of 'training' pedals I'm currently using: VP 2-in-1 clipless/platform pedal. Crank Brothers Mallet or Candy are on top of my list.
Aiyahh... would there be any end to this biking stuff? Anyway, for now, it IS getting more exciting.


Tuesday, 18 November 2008

XR cockpit

XR cockpitI've hunted for Truvativ cockpit for some time now, and found the set offered by USJ Cycles via BBS. Ahh... the bliss of internet. Transfered $ through Maybank2U, and receive the goods a couple of days later via Poslaju.

SRAM stem and handlebar application chart I opted for the XR range from Truvativ, for XC - both the stem and handlebar. This time I'm going Ø31.8 oversize. At 680mm, the handlebar is a bit wide for me. Have to cut it perhaps an inch each side.

The flashlight bracket has to be hacked to be installed on an oversized handlebar. Have to forego the supplied bolt and nut, and use a cable tie instead. Hence the bracket a permanent resident near the center of the cockpit.

Installed Sunday morning and looking neat for now. Never had the chance to have a go yet. Tonight I'm testing it on road insyaAllah, and tune it if necessary.

Truvativ XR stem
XR stem 60mm 5deg and flashlight bracket hack


Monday, 17 November 2008

joy with new mini toy

During a night ride with Naza and kids, I realized that I have lost my el cheapo trusty multi tool. I got it from Tesco Ampang about a year ago for RM12 (I think). With the absence of a proper set of bike tools back then, it helped me a lot with my tinkering on my bikes.
So long my friend, wherever you may be. You served me well, and we had great time learning. Well, time to move on now...

Some time ago, knowing what I need and what's nice to have for a compact multi tool to bring along my bike rides, Crank Brothers' Multi 17 seems to fit my requirements nicely. Well, it's in my wishlist, but never actually looked for it.

Now that I really need a replacement, I went to Aunty's bike shop in Taman Universiti and pondered over the selection of Topeak tools on display. Her's is the only place in JB that I know to get Topeaks. Only one caught my attention - Mini 18+. It has 18 tools in one compact offering. Plus, a nice neoprene bag to store the mini tool (won't be needing it, though - but nice, still). Weighing at 185g (versus CB M17's 168g) and at a very good price (after haggling her to mark down further than the displayed RM98), I took it home. I wasn't really bothered with the weight, anyway.

I have a soft spot for Topeak goods. Their designs are beautiful and a lot of thoughts being put in their products, eliminating the unnecessaries while maintaining aestethics. Coupled with the unavailability of CB in JB bike shops, perhaps that's why I opted for the Mini 18+.

I don't know why the '+', but I know for me it has all the tools I need to bring along on my biking outings, plus more. Complete with a chain tool and torx-25, I don't have to bring separate tools for each, as I do now. And there's also a flat blade for disc brake pads - to press the disc pads back into the calipers if brake levers are accidentally actuated while wheels are removed. I have yet tried out my hands on wheel truing, but now I have the necessary tools for it - 14g & 15g spoke wrenches (the 14g also doubles up as chain pin breaker tool). I can do without the single tire lever, though.

I'm happy with the purchase. Although we boys like to tinker with our new toys, I hope that I won't be needing it much along the trails or on the roadside. The assurance and availability of a reliable compact multi tool are what I need, really.

tool photo taken from Topeak's website.
Topeak logo and slogan copyright of Topeak Inc.


Monday, 29 September 2008

hydration bag

Not to say that I'm not happy with my High Sierra 2L hydration bag.
I am, and in fact it has all the features I need for a decent bag.

This one caught my attention, though.
From Oakley's Mountain Bike range, Tool Pouch 2.0 is pretty neat.
It has that understated look.
Added with 100 oz (about 3L) Moflow bladder from Polarpak, it's in my wishlist.
Wonder where I can have a look (and feel, inspect, drool over) here in Malaysia.


Wednesday, 24 September 2008

bike rack dilemma

20/9/08
on the way to pasir gudang kayuh malam 2 RV point, i was stopped by police at a road block - he saw my bike at the rear of wira sedan that i drove.

the officer asked me what i did wrong. i said i did not do anything wrong.
he gestured to my bike and mentioned that it was wrong to carry it that way.
he pointed out that my rear wheel was protruding more than the width of the car, and the rack elongated the car's overall length.
he asked whether i think it is stable or not having a bike on the carrier behind the car. i said i was pretty sure that the bike and the carrier are stable.
again, he stressed that it is wrong to do it and he went on further saying that it is okay if bikes are carried on the roof.
at that point, i just listened to his explanation and such, blah blah blah.
anyway, i listened intently with a stoned face, and head nodding all the way.
he agreed to let me go this one time, and not to do it again.
well, i put it all behind and headed to the RV point in Cahaya Masai.

22/9/08
i called jpj's number available on its site.
redirected to 4 officers, before ended up with a very long wait for an officer in technical department to answer my query.
went back to jpj's site and looked for any info.
got this:
http://portal.jpj.gov.my/v5/index.php/en/Technical/Vehicle-accessory-installation-application-guide.html
the form doesn't mention 'basikal'. anyway, it's a general form/letter for all sorts of stuff to be carried on the vehicle.

also:
http://portal.jpj.gov.my/v5/index.php/en/Technical/Guidelines-on-the-Modification-of-Private-Vehicles.html

searched some more,and i got this:
http://fakawitribe.com/tribaltalk/viewtopic.php?t=2310&highlight=

entry by keropok, May 2007:
Guys...i was the one who responded to BBS
This is my take on the issue which is freaking retarded and waste of time...
Got stop at east cost highway from Kuantan to KL last month. Got stop by JPJ and was ask form one of them for the so call approval letter from JPJ. I was kinda of confuse coz i tought that u dun need one. As i could not produce it..i got summon for it. Thank you JPJ for making me go all the way back to Thule Ikano and screw the wrong guys for nothing.....
The next day (as i was still on leave) went to JPJ in Putrajaya and inquire about this so call approval letter. Yet they made me wait for 1 hour just to get verification on the issue. I was pass from one counter to another like a football. Finely after 2 hours of footballing was able to meet up with the "pengarah" from Bhg Teknikal JPJ. Nice guy and was well inform on the procedure of how to get it approve. But when i ask him that Thule said it was ok to use it. His reply was
" Tidak mengikut specs kenderaan asal" he also mentioned that Thule came to see him and wanted to get approval to sell the racks. But JPJ said u can sell but we will not come out with a letter or statement saying It's JPJ approval. rear mount racks are a no go for hatch back cars..as it posses a danger if the car were to be ram from behind. If for sedan you will need to make sure that the number plate, brake lights and signal lights are visible from behind. So it's best to go wif the top mount.
So to make a long story short......Get the borang for RM2 at the counter on the 2nd floor....fill it up provide 3 pics from different agle (front, back and side) Make sure the pics are clear and no handphone pics.....Learn the hard way for it Go back to JPJ putrajaya same floor submit the borang and pics....and wait. if yr lucky the suffering of waiting will be about 1 hour...of not..like me half the day....Just to get a signature and JPJ chop......And yet still have to pay the farking summon.......jezzzzzzz....all this for just to hv fun with nature.....
=end of entry=

i'll settle with the issue for now - just stash my bike in the car.


fancy bike lights

while in Ramadhan the hot topic is night riding, here's a good accessory to bling-bling up your bike.
http://www.monkeylectric.com/m132s_gallery.htm

cool!


Thursday, 18 September 2008

Chain Tool / Multitool?


http://www.topeak.com/products/Tools/ChainBOT

Another item in my wishlist. Again, a beauty from Topeak.
Claimed at 148 grams, reported price is $42 in US.
The price is actually for the design - it won the prestigious design award by red dot.

But then again, Crank Brothers have these:

http://www.crankbrothers.com/multi17.php

Crank Brothers' Multi-17 tool.
Priced at $27, and weighs 168 grams (with all the other tools, mind you).
Hmm... this would well replace my dilapidated Tesco multi-tool - and I don't have to carry separate chain tool.

Problem is, Crank Bros listed only one dealer for Malaysia - and it's in Singapore!
Anybody kind enough to get me one?
Ehm... my birthday is in March (but you don't have to wait until then, really).


Thursday, 4 September 2008

rear view mirror


http://www.topeak.com/products/Xtras/Bar_n_Mirror


this is nice...

i need this for cycling to work, especially when going along the highway.
cars and motorbikes going vroom vroom, at high speed (from the bike saddle, they are ultra fast).
i don't need the bar end, though.
and it is expensive - RM100+.

think i'll settle for a cheapo mirror from the bike shop in Masai then.


Wednesday, 3 September 2008

riding paraphernalia

This is a list of things that I always bring with me (or wear) for any ride - road or offroad.
  • Bicycle
  • Handphone
  • Helmet
  • Gloves
  • Shoes - for now: a pair of futsal shoes
  • Spare inner tube
  • Pump
  • Multi-tool - a cheap one from Tesco
  • Tire levers
  • Tube patches and glue - also from Tesco
  • Long nose pliers
  • Chain tool - yet to have spare links to complete
  • Water - at least a bottle (750ml) for short trips i.e. to work. For offroad: 100 Plus - 1.5 to 2 liters
  • Identity Card
  • Cash - without coins
  • Headlight & Taillight - for road and night rides
  • Reflectors (on jersey)
  • Wet lube
  • Cable ties (assorted sizes)
  • Plastic bag
The list above is based on the one found in KLMBH site - a must for every rider participating in any Bash.
I added some more, after extensive reading from few other sites. Also, from personal riding experience and tips from other riders.
There are also some items left out - perhaps not needed, and there are tools that I just don't have any idea how to use.

Safety First. Helmet, reflectors and lights are the important ones. Other than that, the items stuffed inside my bladder bag are needed during emergency situation. There's no need to carry extra weight.

Some riders may prefer to stay lean, thus they carry very minimal emergency/spare items. Fine, if nothing happens. If something does happen (and according to Murphy's Law, it will), they'll turn into bloodsuckers, although they are actually very nice people. I've been to offroad rides where a guy didn't even bring his own water, but he put his supply in another rider's bag. It's plain evil, no excuse for that.

I bring with me my IC for safety purpose. Once we rode up into 'Bukit Radar' in Plentong. It is a Malaysian Air Force base. While going uphill, there were army men going up and down too. I thought their perplexed faces were because looking at us crazy people cycling up the hill a la Le Tour de Langkawi. It turned out that they were actually alarmed because civilians are not allowed to go up there. While taking a breather when we got up at a point (beyond which, is restricted area), 2 army personnel came down to us and began questioning. To confirm that we are Malaysians (and not spies from foreign countries), we were asked for our ICs. Gladly we showed ours, and soon we went down off from the restricted area.

So, bring the essentials for safety and emergency. Pack light if you can, but never to leave anything important behind. You might regret not bringing along a tool just to save 200 grams. Heck, I know a guy who brings with him all sorts of spares, he's like a bikeshop in the trail. Actually, I do feel safe when he's around. Me, a bloodsucker, maybe?


Thursday, 22 November 2007

got my meter!

I've wanted one of those for years.
It's a bike meter. Or cyclocomputer, in bike geek lingo.

A Cateye Velo 8, for RM58 from Zaidi aka mr.beskal thru BBS.
Apart from the cool appearance of having a digital gizmo on my cockpit, the real reason for it is to gauge how I'm doing on the bike.

Here's the functions that it boasts:
  • Current speed
  • Maximum speed
  • Average Speed
  • Trip distance
  • Odometer
  • Clock
  • Elapsed Time
  • Calorie Consumption
If you took the time to count, they are 8 functions altogether (hence the name Velo 8... duhh!)